How many photos are on your phone right now? While you check, let me posit a guess: One zillion. Am I right? Thought so!
Sure, smartphones have given us the convenience of having a camera with us at all times but it’s also super inconvenient to have one zillion photos to sort through. We thought we had escaped the storage nightmare of shoeboxes that our mothers employed, but this may be worse IMO.
While there are a TON of options out there, my favorite solution for storing, organizing, and sharing photos and videos is Google Photos.
In addition to it being super simple to use, here are a few other reasons I love it:
- You get unlimited storage for free. You can pay if you want your photos stored with the original resolution but you’ll probably find the standard high-quality free version is fine. (Images over 16 megapixels are compressed to size, and videos are capped at 1080p resolution). Because I have to produce hi-res images for collaborations and my website, I do pay for additional storage!
- It’s packed with features that make it easy to organize, use, share, and manage photos and videos.
- It works on all devices seamlessly – you can set it up so you have to do little to nothing to get your photos uploaded.
- You don’t need to be overly tech-savvy to use Google Photos – trust and believe! If you can work your phone, you can work G
- Other people don’t need to have Google Photos to be able to view the content you share with them.
Get The App
- Download the app from the App Store or Google Play Store.
- Sign-in using your gmail account (if you use it for email) or create a new account (it’s free!)
- Once you’re signed in, you simply follow the prompts to start uploading your photos and videos. Be prepared. This can take a while if you have a lot of images and videos – like my (59,485 images)
You can also do this on your desktop or laptop as well! Once you’ve loaded all the photos from your phone or computer, you can view them from the app on your phone or on your computer by visiting photos.google.com.
SHOP MY FAVORITE TECH

• • •
Backing Up & Syncing Your Photos
My phone is set to automatically upload my photos to Google Photos when I’m connected to WiFi. It’s a good idea to make sure this setting is turned on if you have a limited data plan on your phone and really just to be on so that you never have to wonder if your photos have been uploaded.
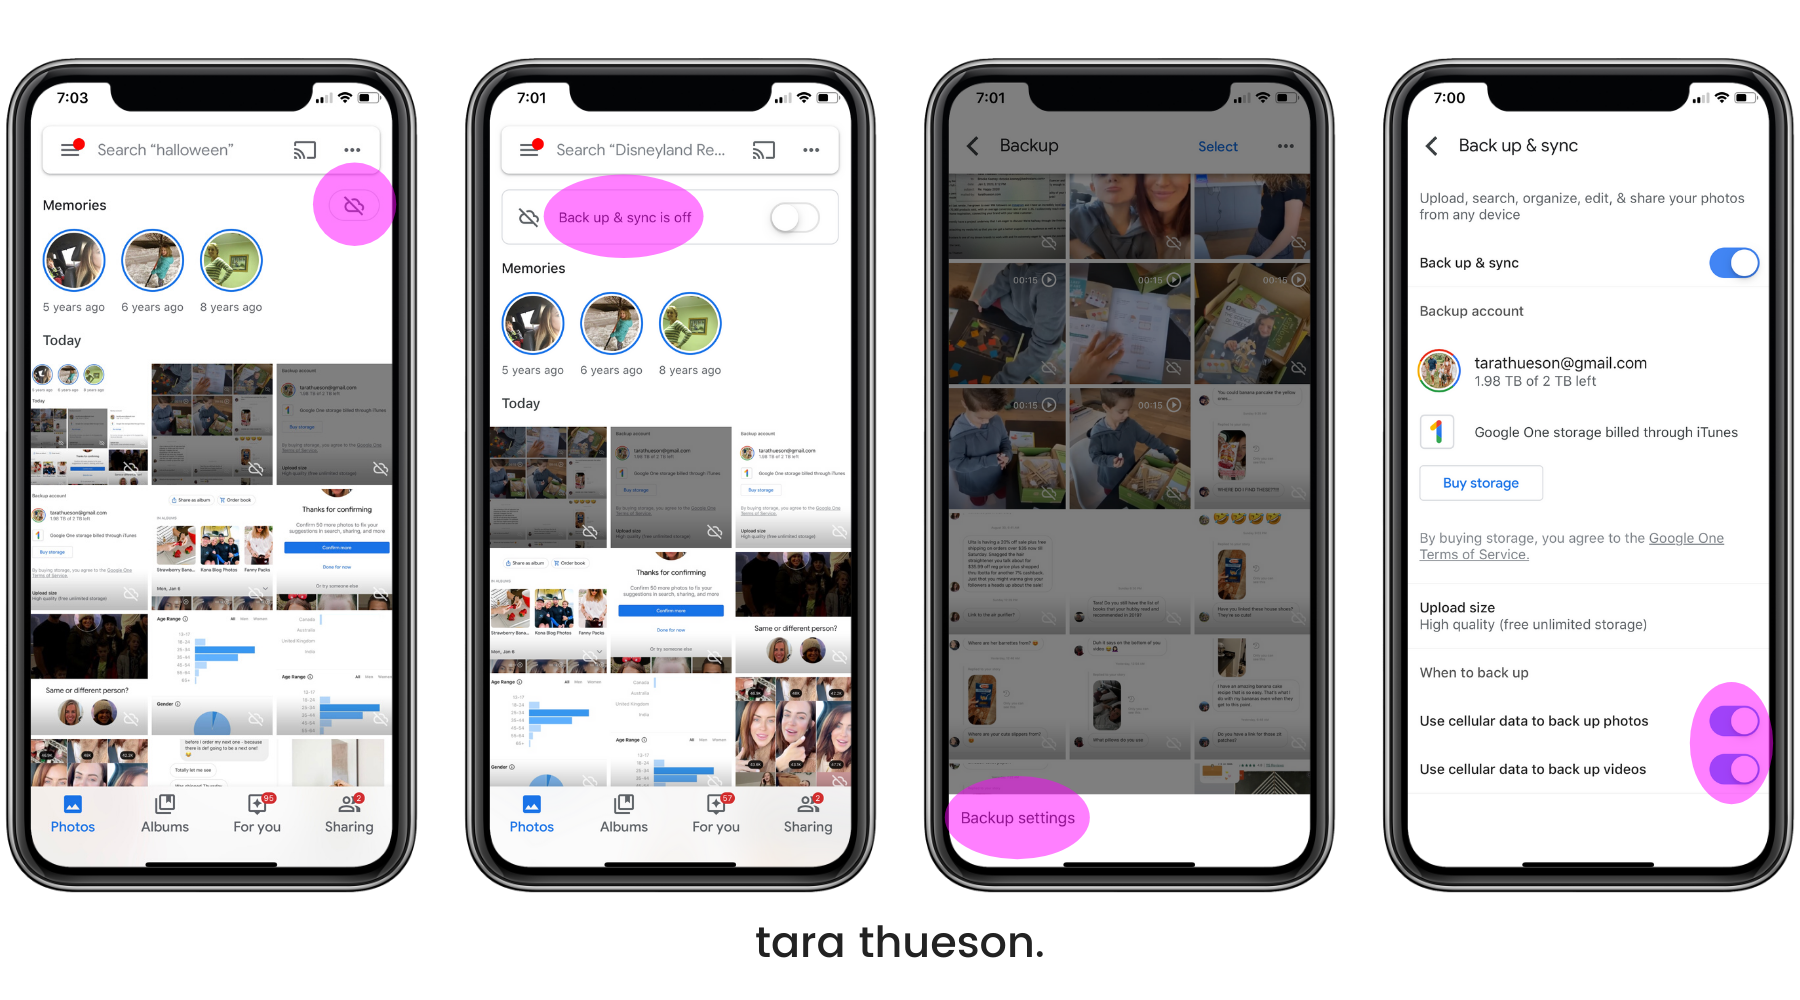
To turn on the WiFi backup setting:
- Open the app and tap the Cloud icon in the top right.
- Toggle the slider to turn on Back Up to turn on the automatic uploading of photos or tap “Back up & sync is off” to access your backup settings.
- Tap the three dots in the upper right corner and then tap ‘Backup Settings‘ at the bottom of your screen.
- If you want to make sure your phone ONLY backs up when on Wifi, make sure the two options at the bottom of the screen, “Use cellular data to back up photos” and “Use cellular data to back up videos” are turned off.
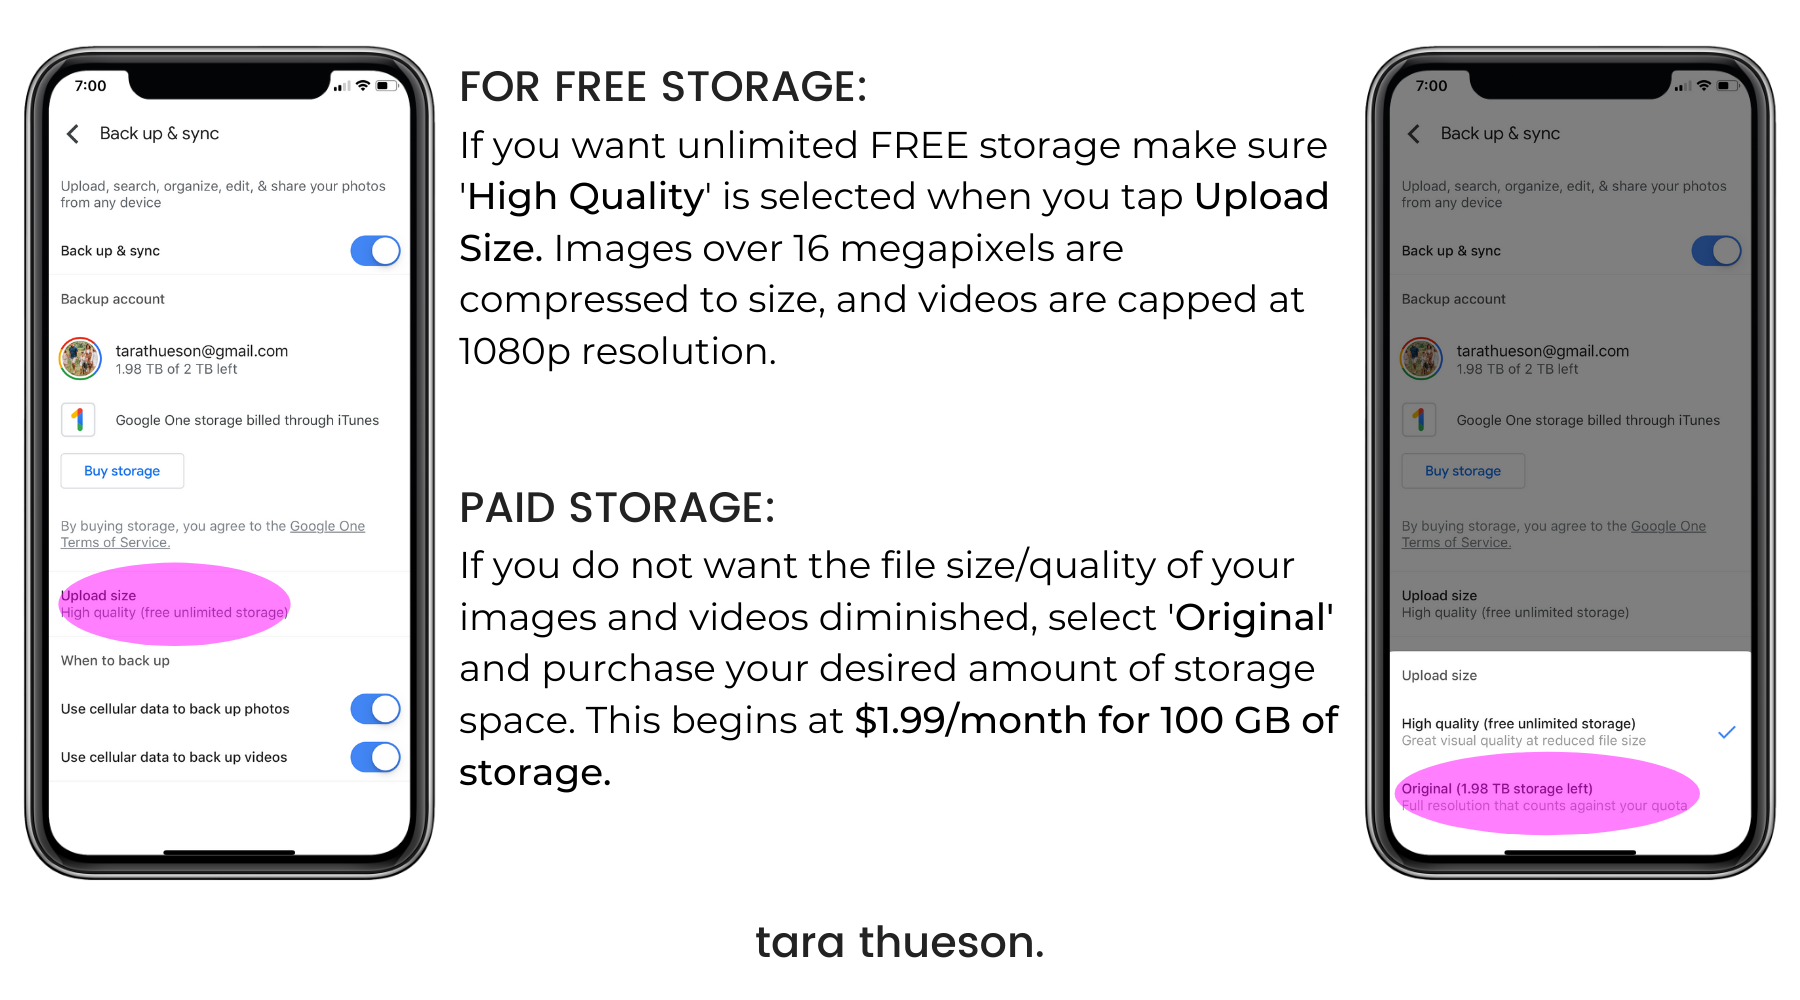
Important to remember if you don’t want the quality of your photos and videos to be diminished! Select “Original Quality.” It will preserve the original quality, megapixels, and resolution of any photo or video you upload, which sometimes exceeds the limits of the High-Quality setting. For a minimum of $20 a year, your photos will remain untouched!
Navigating Google Photos
Once you’re in Google Photos, it’s fairly easy to navigate.
Aside from choosing to backup your photos (always make sure that cloud icon is turned on), you have 5 main functions from your home screen:
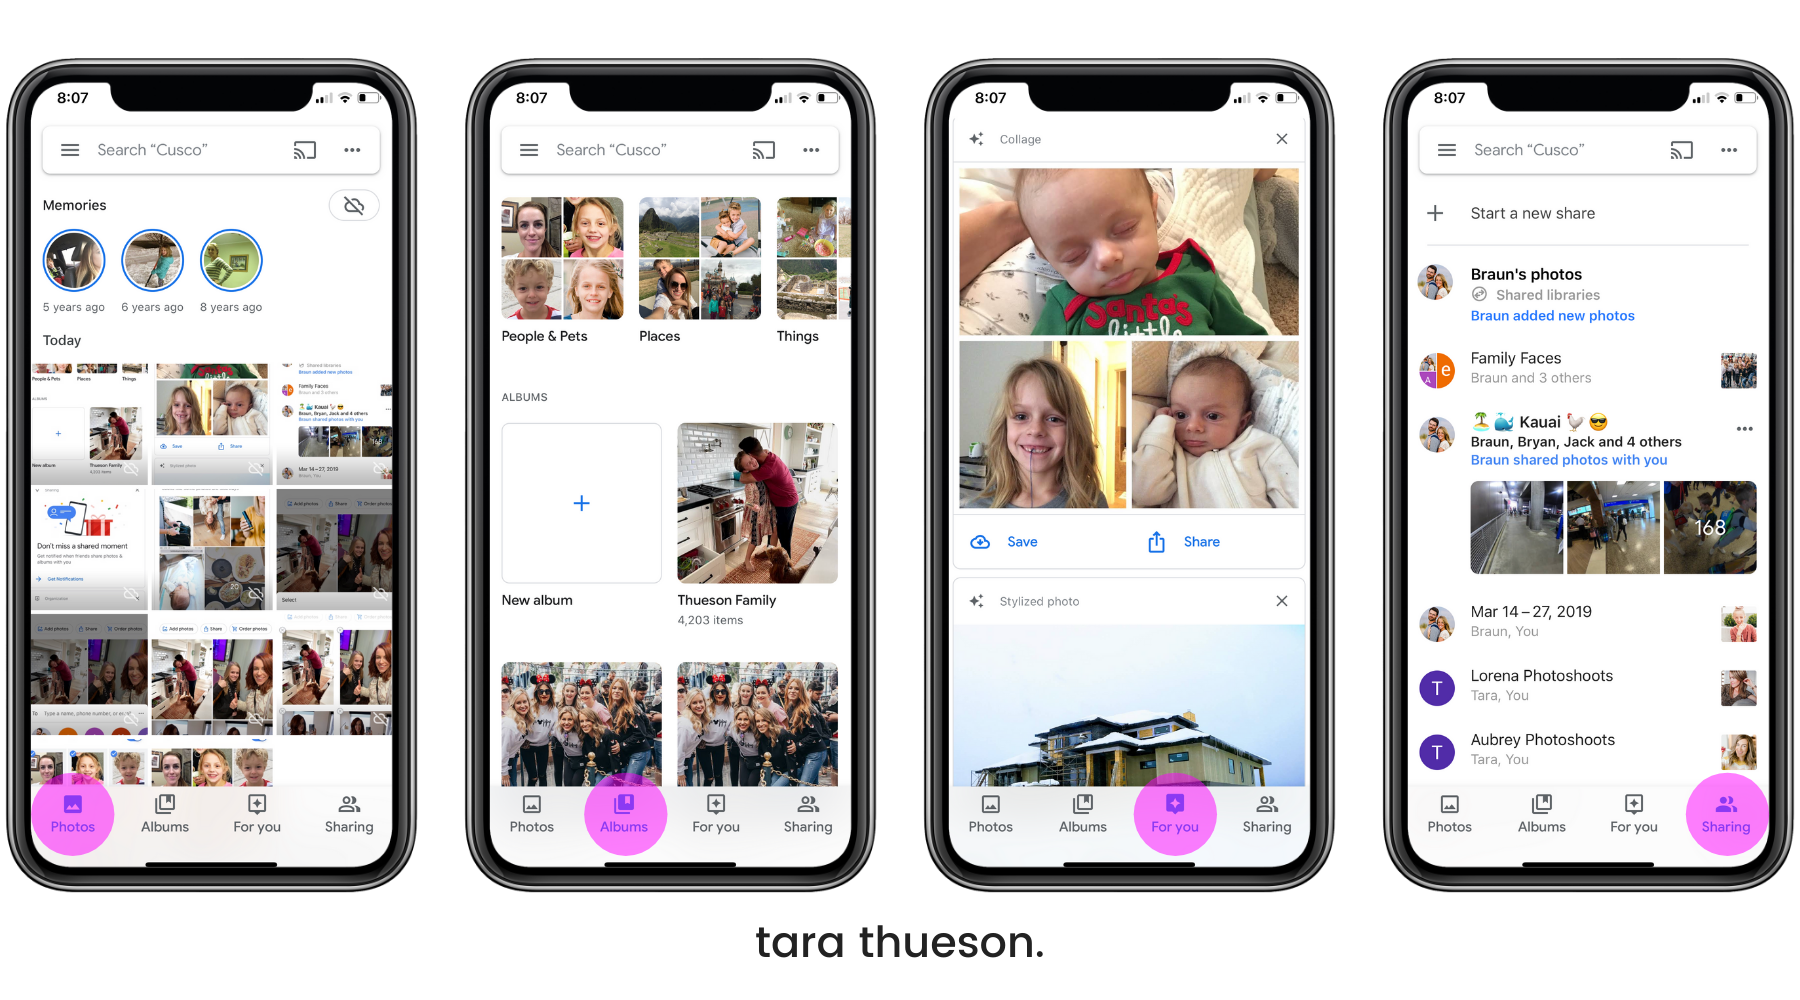
- Photos: This is where all of your images live. It’s one continuous stream similar to the photo album on your phone.
- Albums: This is where you can access all of your photos albums, whether you created them, Google created them based on their smart-recognition, or they were shared with you from another user. When you tap on the albums section of the Google Photos app, it shows you three categories on top to search for the image you want to find: People, Places, and Things. The People category shows images of faces, and the Places category shows locations, based on both geotagging information and also identifying specific well-known landmarks in the photo. The Things category can not only show non-human subjects but also photos and videos that were taken for specific events, like birthdays or vacations.
- For You: These are suggestions and creations courtesy of Google Photos. They will serve up collages from similar photos or events, create animations from photo series, and even suggest creative things to make the most of your photo library! You can save them, share them, or edit them and make them your own!
- Sharing: This is where you can share albums with friends, family, or work contacts. You can also set up photo sharing so that every time you upload a picture of your good friend Kevin, it will automatically be put in the “Kevin” album and he can get notified! This is also where you can see albums that have been shared with you.
- Search: One of my favorite features and why I love Google Photos above other photo storage platforms
Search Google Photos
One of my favorite features is the ability to search your photos based on their content. Tap the search bar and you’ll have a few options:
- historic search terms (things you’ve searched for before)
- favorites (any starred photos)
- videos
- selfies
- screenshots
- and my favorite, by facial recognition.
Type your own name and you’ll most likely bring up any photo you’ve taken or anyone had shared with you. This makes it very easy to surface photos from long ago; maybe you remember what you saw, but not when you photographed it. Once you have all of these photos gathered, you can select the ones you want or create an album.
The search is so good that you can type in a name, date, and event and it will bring up those photos!
Making Search Better
When you first tap the search bar and enter a person’s name or select their picture from the line-up.
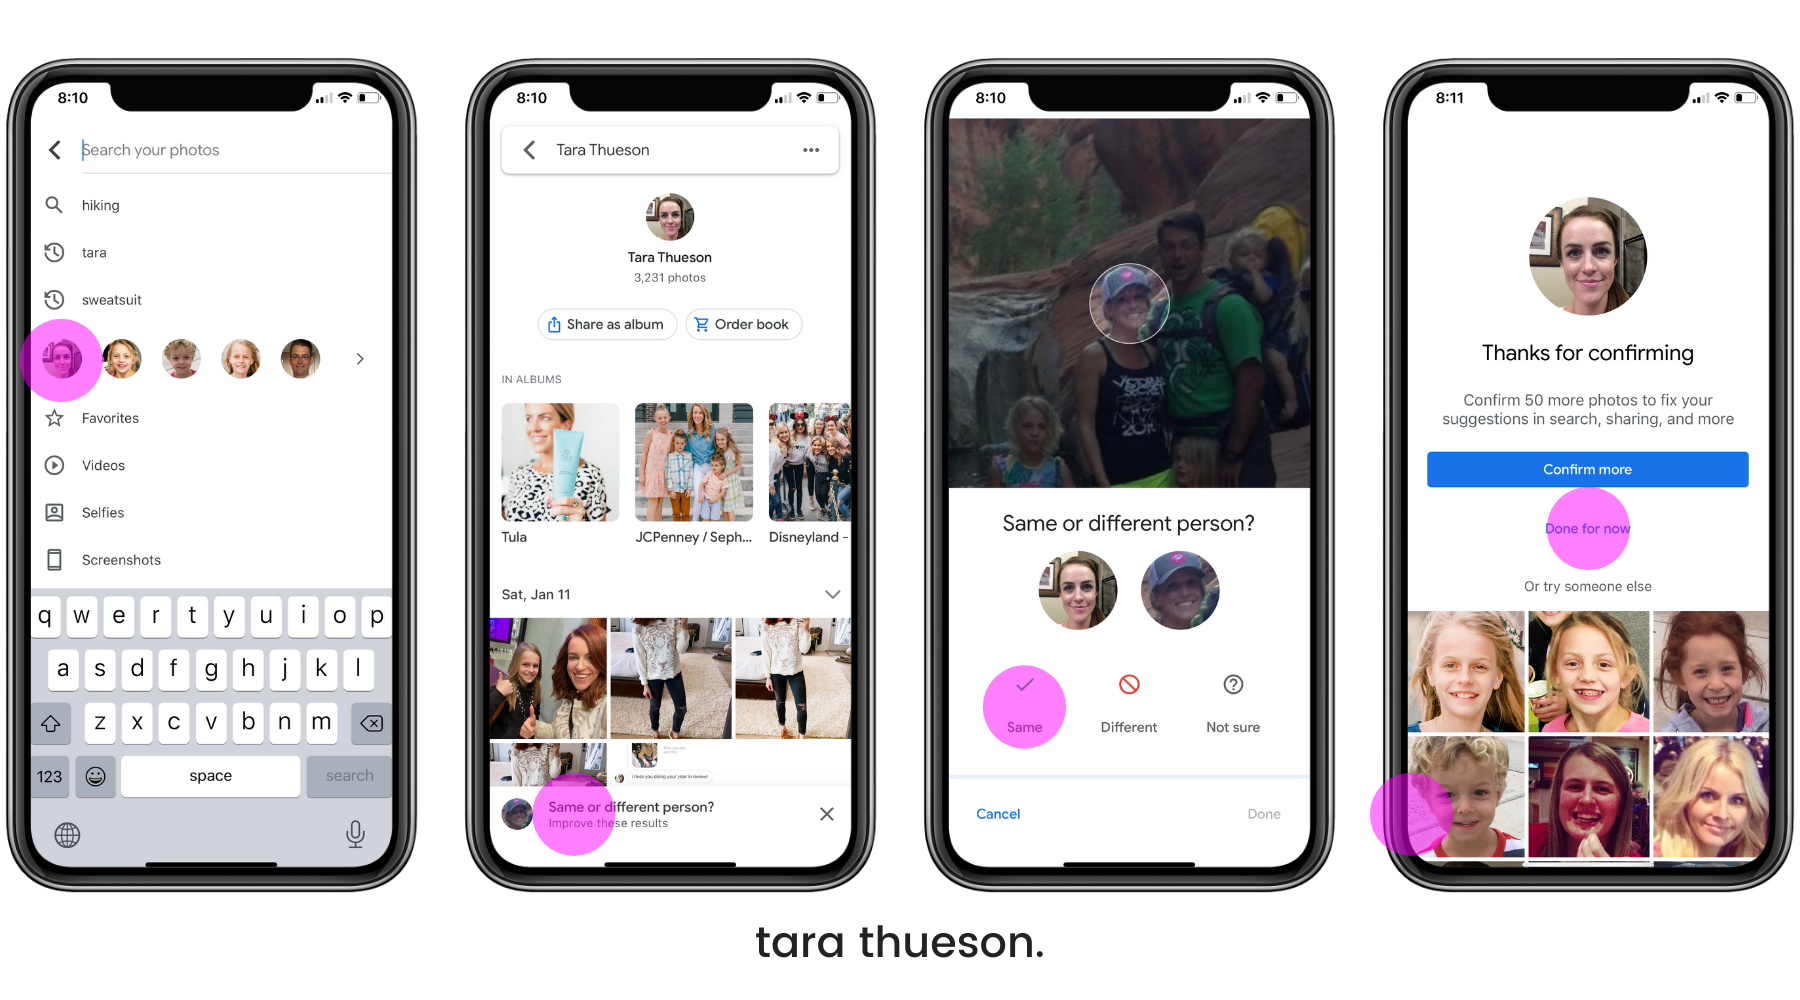
Once selected, you will see the option at the bottom of the screen to tap Improve These Results. Tapping this option will allow you to help Google Photos better recognize the subjects of your photos. It will show you a number of pictures and ask you to distinguish the person they have highlighted is the same or different than the one you searched for. Going through this practice a few times a month just makes it better at categorizing your photos!
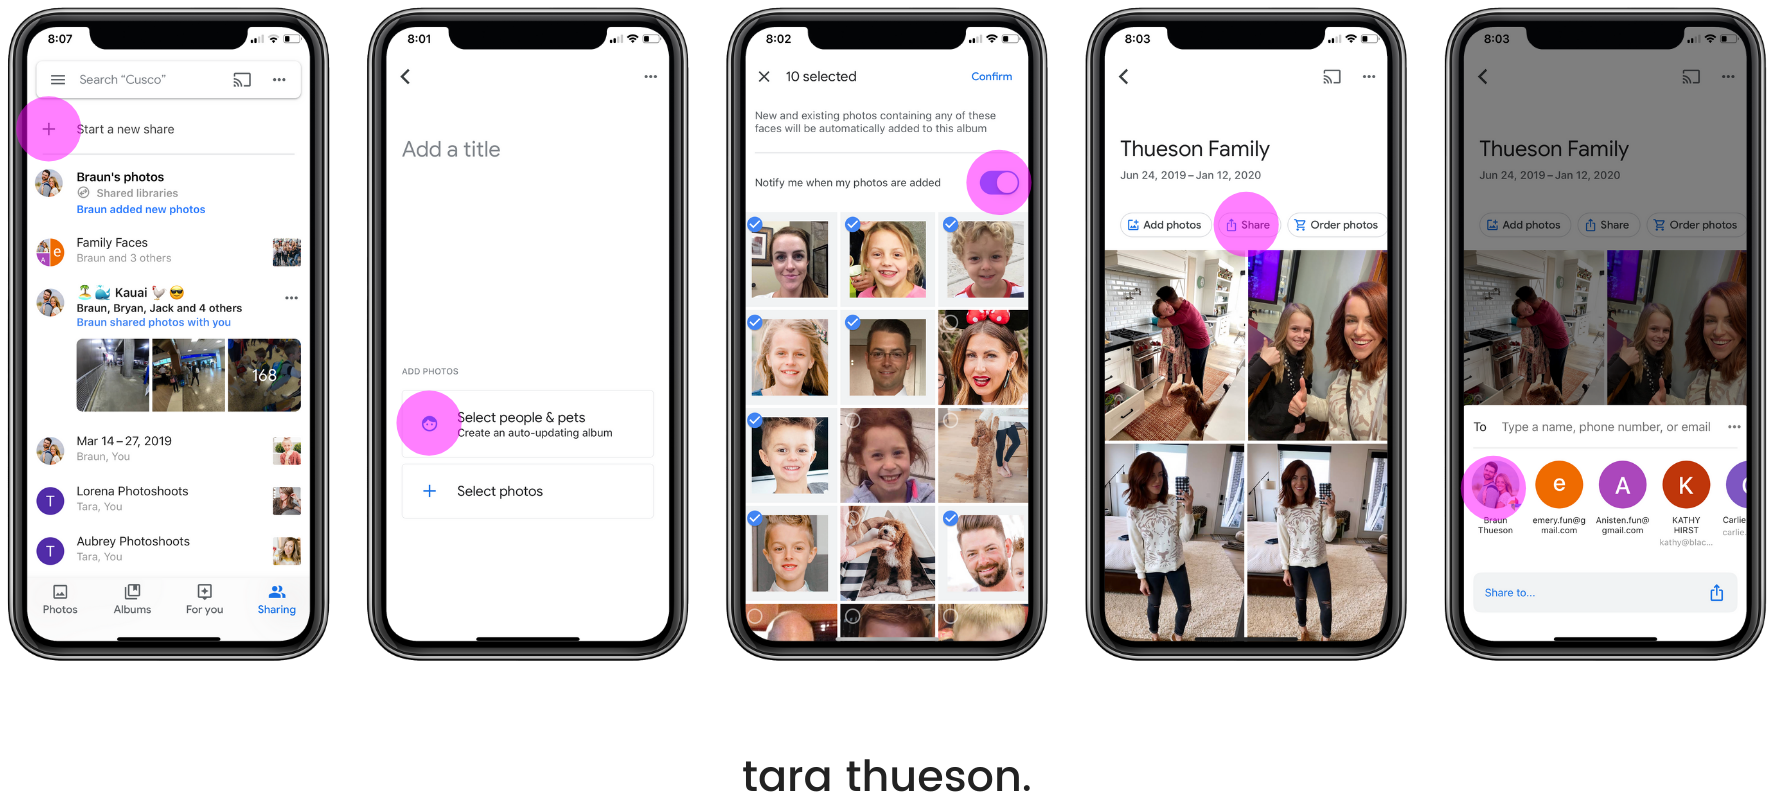
Sharing Your Photos
Another one of my favorite features of Google Photos is its automated photo-sharing options. You can create shared photo albums, let Google automatically fill them with photos of specific people, and let your friends browse and even download any of the images in those albums. To start sharing your photos, tap on the Sharing icon at the bottom of the app. Next, tap Start a New Share. From there, you’re able to select the faces of the people who will be auto-funneled into the shared folder and invite your friends to see the pictures.
Using that method, try this: Set up your Google Photos app to automatically share any photos you snap of your kids to be shared with your parents and your in-laws, so each set of grandparents gets sent pictures of your kids every time you take a new one!
The computer-vision algorithm that recognizes specific people’s faces isn’t perfect, but it’s good enough to make this work. For example, the system does a really great job of recognizing faces (doing the matching thing at least 1-2 times a month that I shared above helps as well! Since this computer-vision code lives in the cloud, it keeps improving; it can even identify pets now!
Copying Albums From Your iPhone to Google Photos
While there isn’t a button that does this for you automatically, I have found a way to transfer over the albums I create on my iPhone to Google Photos. On your iPhone:
- Open your browser to photos.google.com (instead of opening google photo app)
- Select Create Album
- Title Your Album (I gave it the same title as the album in photos app)
- Click Select Photos
- Click on the upload cloud at the top right
- Select Photo Library
- Select desired album
- Individually select each pic
- Select Done at top right
Photos will begin uploading to Google Photos! In fact, there isn’t a photo service out there (Amazon, Dropbox, Flickr) that will automatically duplicate your albums from your phone.
SHOP MY FAVORITE THINGS
• • •
Free Up Space On Your Phone
You’ve now set up your phone to upload all of your images the moment you walk in the front door to your house and connect to Wifi! After you start doing this, you’ll see a prompt within Google Photos every few days offering to scrub those backed-up photos from your phone in order to free up all that storage space. Do it—tap Yes.
Once you back up, your photos will still be viewable in the app, but they’ll also be accessible in a web browser at photos.google.com. Just log into your Google account and you can browse, download, organize, and share your images from any computer. It’s a great convenience to not have to reach for your phone whenever you want to send somebody a photo.
If the prompt doesn’t show up or you just want to clear your phone, go into settings on the left-hand side in the Google Photos app and select Free up space.
You’ll then get a pop up telling you how many items can be deleted from your phone. Remember, you’ll still be able to access these photos at any time via Google Photos. They’ll just be gone from your phone’s camera roll
Reversing The Process: Download Images To Your Device Or Computer
If you delete images from your phone but want them back again, downloading from Google Photos is straightforward.
- Open the Google Photos App.
- Tap on the image (or select multiple images) that you want to download.
- Press on the triple dots on the top right.
- Tap on download or Save to device.
- The image will be saved in your camera roll
In Conclusion…
Now you can see why I prefer Google Photos, right? It’s pretty nifty and has gotten me through some pretty heavy workweeks when sitting at my computer to get everything done just wasn’t an option. And I didn’t even scratch the surface! I just gave you the basics. But here are some more tips and tricks you can try out while using Google Photos:
- You can now see information about a specific photo, such as its date, its file size, and where it was taken, by just swiping up on that photo.
- You can automatically create movies from your Google Photos pictures by tapping on Assistant, and then select Movie. There are 10 different categories to choose from, including Love Story, Selfie Movie, and Doggie Movie.
- If you share a photo or album with others in Google Photos, they can now “like” images by tapping on a heart icon.
- There’s a Color Pop feature that lets you keep the color on the subject of an image in Google Photos, but then turns the background into black and white.
- If you make motion pictures with your Pixel 2 or Pixel 3 phone, Google Photos lets you turn them into GIF images.
- You can edit photos and apply the same edit to a group of photos all at the same time!
I definitely plan to go more in-depth with this in the future but hopefully, you can get better organized with your photo storage! If you have any additional tips and tricks, tell me in the comments below!
Xx Tara
P.S. before I toggle on automatic uploading, I use the Slidebox app to sort pictures and get rid of duplicates or any other photos I don’t want! It’s also a GREAT and FAST way to sort photos into albums.
Do you back up anywhere else? Are you afraid of something happening and losing them all from Google? Or someone accessing them?
One thing I love about apple photos is that they save them in “live mode” does google photos save this or does it just save the single picked photo? Thanks for all the tips!
I love Google Photos! However there is one thing that is annoying. In shared photos, there is no way to sort pictures. Even if I share according to face, there is no way to sort the faces. Google really needs to add a way to sort shares albums.
I’m able to sort by face! But maybe I’m not understanding your comment?
I save everything in its original form so it saves all of my live photos!
I have them in Dropbox and an external HD. An external hard drive is the best place (IMO) to store them long-term! But having them in Google Photos is hands down the easiest, most accessible storage option!!
Ok I have read both this post and your Slidebox post. I love google photos too and use that one On my phone. I haven’t tried Slidebox yet but just bought it.. but I’m thinking are both these apps mostly for use on your phone with more current photos? So my question is what do you use as your main system on your desktop to store and organize it all?? Google photos too?? On my desktop computer i have like 2 iPhoto libraries and so many multiples of same photos and want something to organize all the duplicates .. what Would u use to sort Through ALL OF IT on your desktop? Slidebox and google do that for desktop?? I’m so overwhelmed and need help haha thanks!