I’m a busy lady. I got ish to do and finite time to do it in.
And yes, I can and have hired fancy video people to do things, like last year’s Father’s Day video for Braun (totally worth the money). But the truth is, if you don’t have the time or budget for a big production, a DIY video is just as good.
You just gotta have the right equipment (your phone) and some adorable participants (your kids).
So what’s the one app that can help you edit out the bad parts, add subtitles or text to your video, and then help you polish it with some free music?
Introducing InShot
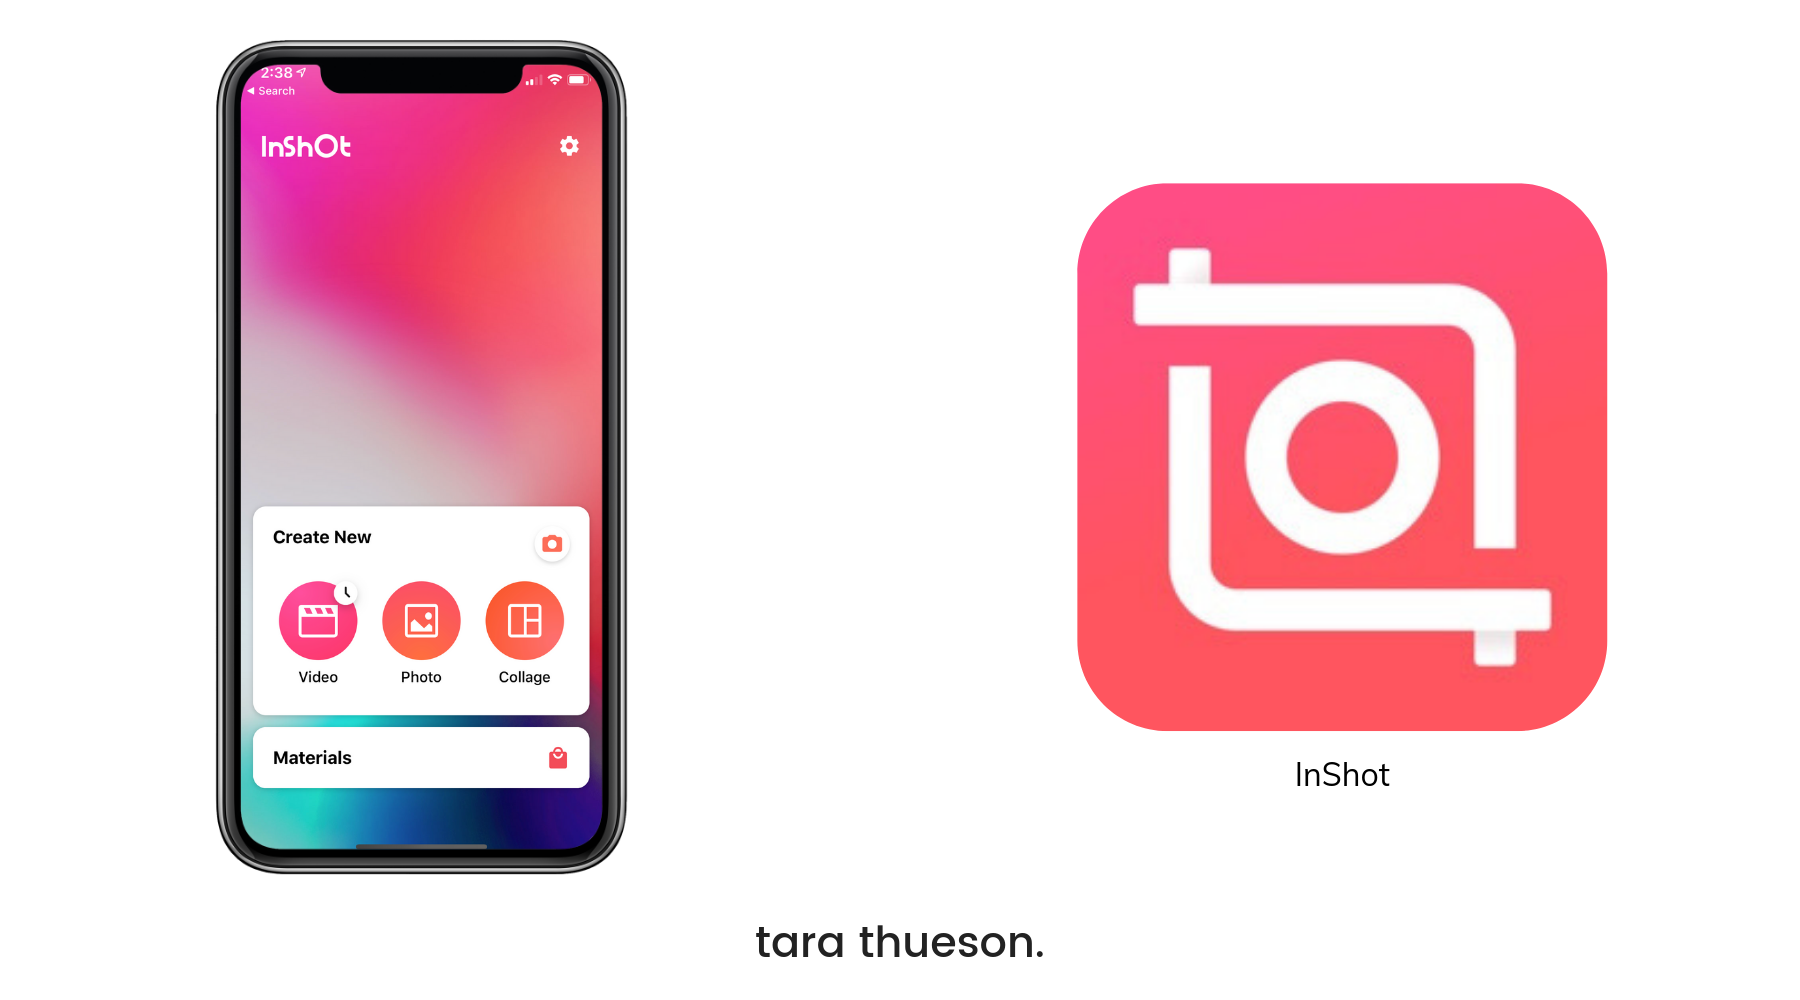
In Shot is an awesome video app that allows you to take existing videos and adjust them for whatever platform you want – meaning you can take widescreen videos and change them to work for Instastories without cropping! Or you can keep them widescreen (16:9) like I do whenever I’m making a home video. You can also:
- Edit video (and photos) quickly and easily on your phone – trim, delete sections, adjust speed and even merge videos and images! It even allows you to sync sound and video for detailed editing (not bad for a smartphone app!).
- As above, you can blur the border for photo and video to make any video “ready” for the platform specs you are working with. Convert Your Instagram Stories to Other Video Sizes in a Snap!
- Add music effects and voiceovers. It has many fun sound effects but you can also add your own music via mp3 files as well as voiceovers.
- Make videos extra special by adding text to photos and videos using basic fonts as well as add filters. You can also add emojis on photos.. and video!
- Pinch video to zoom in and out on your phone screen.
- You can share to all the usual suspect social platforms (in high resolution).
But since we’ve got an actual real-life video to work on right now in time for Father’s Day, I’m going to take you through the steps you need to take to ensure that the guy in your life has the best day ever!
Creating A Video 101
If you haven’t yet shot any videos for your big Father’s Day video, do so now. If you need a quick refresher or some sample questions to ask your kids you can grab those from the Father’s Day highlight on my IG!
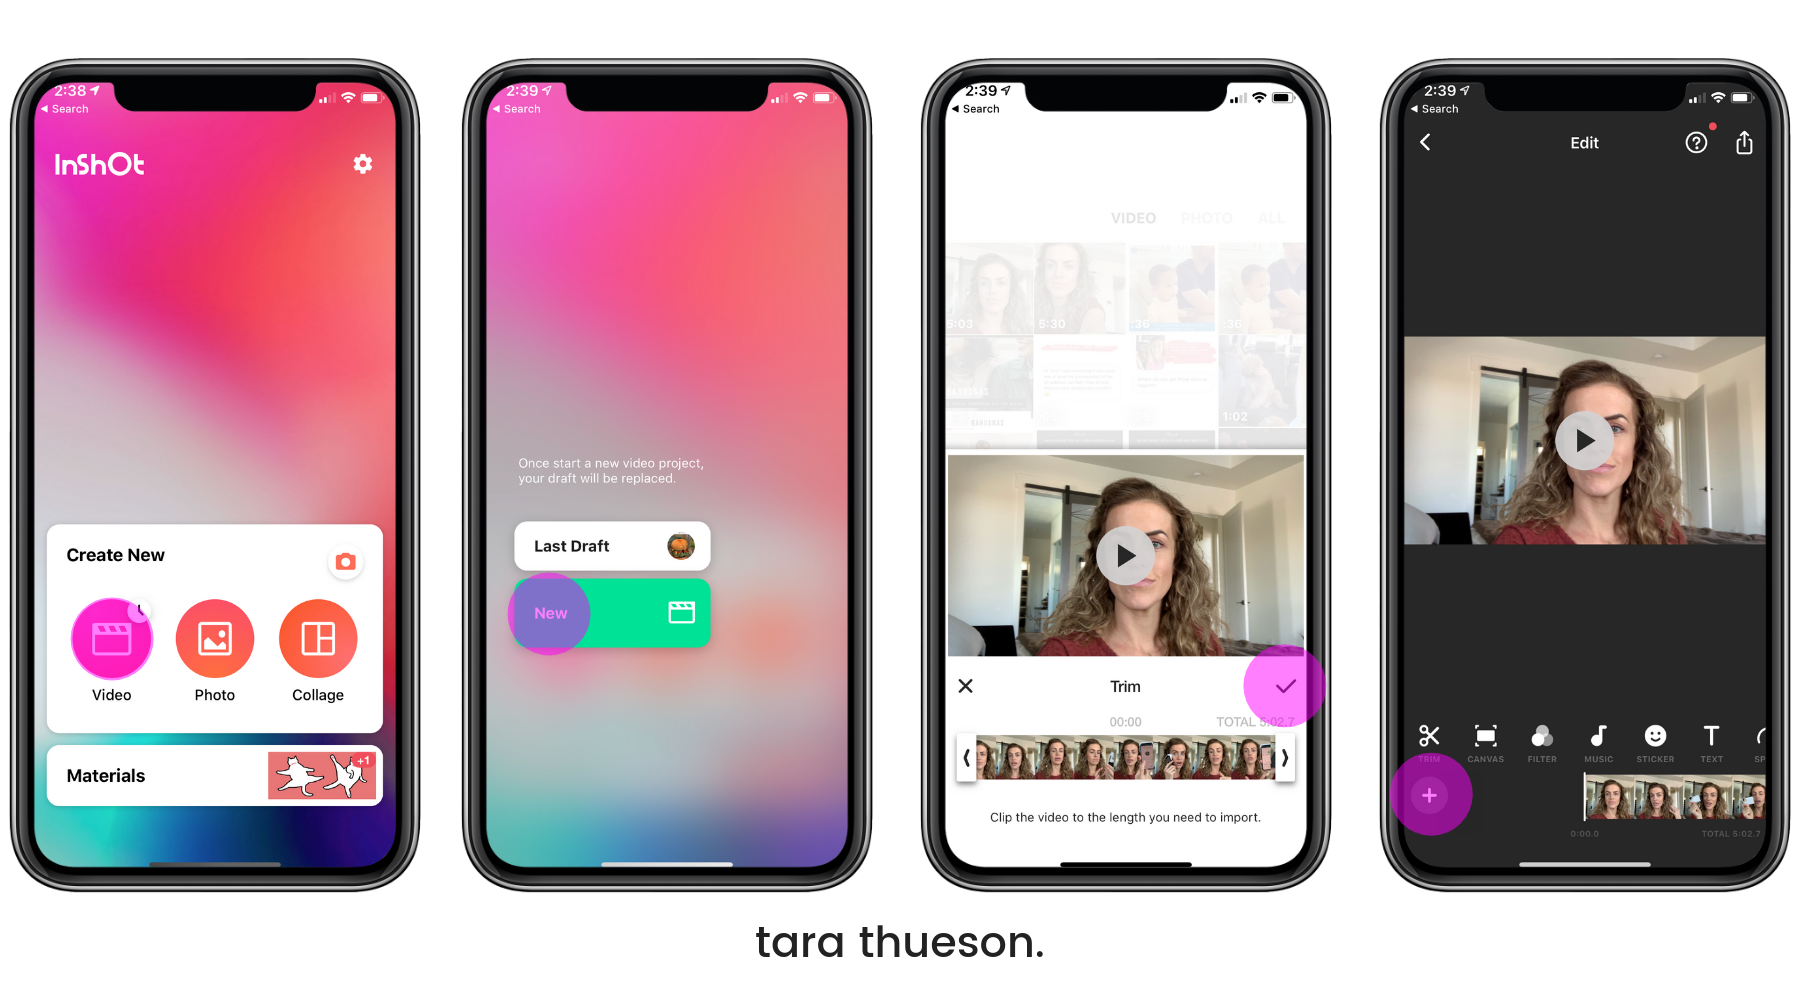
Once you’ve got your videos done, you’re going to open InShot on the same device you shot your videos with. It’s going to import and if you’ve got more than one video, you want to make sure you hit the ‘+’ sign on the left to continue adding them until you have all of your footage in your main slider. It may seem overwhelming to edit all at once but trust me, you’re going to be fine!
SHOP BRAUN’S FATHER’S DAY GIFT GUIDE

• • •
Editing Your Video
Every place you added a new video is marked as a ‘Transition’. This just helps you know where one video begins and ends.
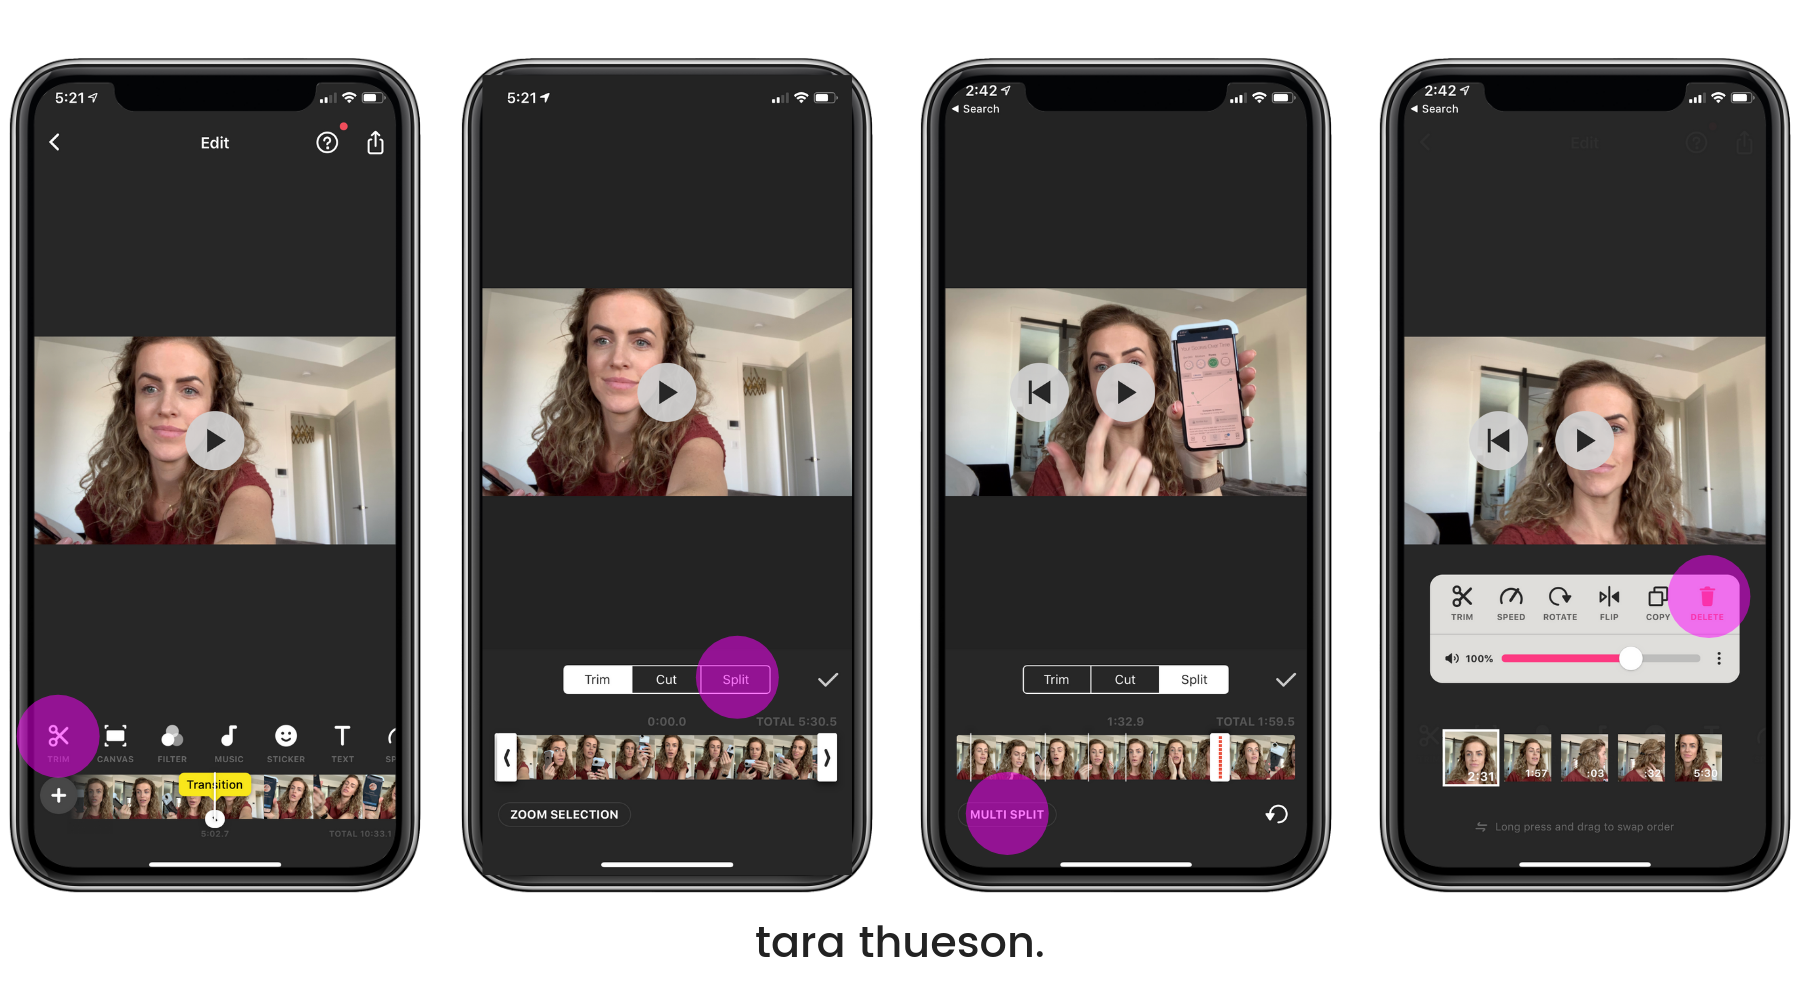
Next, you’re going to select the scissors to start editing your video. You will have 3 options:
- Trim: this allows you to move the white arrow on your video to cut off the ends of your video – avoid this unless you’re working on a short clip that you’re editing for something like Instagram stories.
- Cut: this allows you to cut sections out of your video – I don’t recommend this unless you know exactly what you want to cut!
- Split: this creates additional ‘transitions’ in your video that will treat each one like a new section – this is what we’re going to use!
You’ve now got 4+ videos all in your feed. What I like to do is create sections or new transitions around the parts of the video where I’m asking questions and when my kids are answering. If there are a few seconds before or after they answer, I would leave those in as well so that you have more video to work with.
Once you feel like you’ve cut it down as much as you can, you now have sections to work with, edit, add music to, and rearrange for a better layout! You can click on any section like in the last frame above and do any fine-tuning, rearranging (just pull and drop it between two other sections), or delete the clip altogether. Since you already sectioned out your talking bits, those should be easy to delete!
Saving & Formatting Your Video
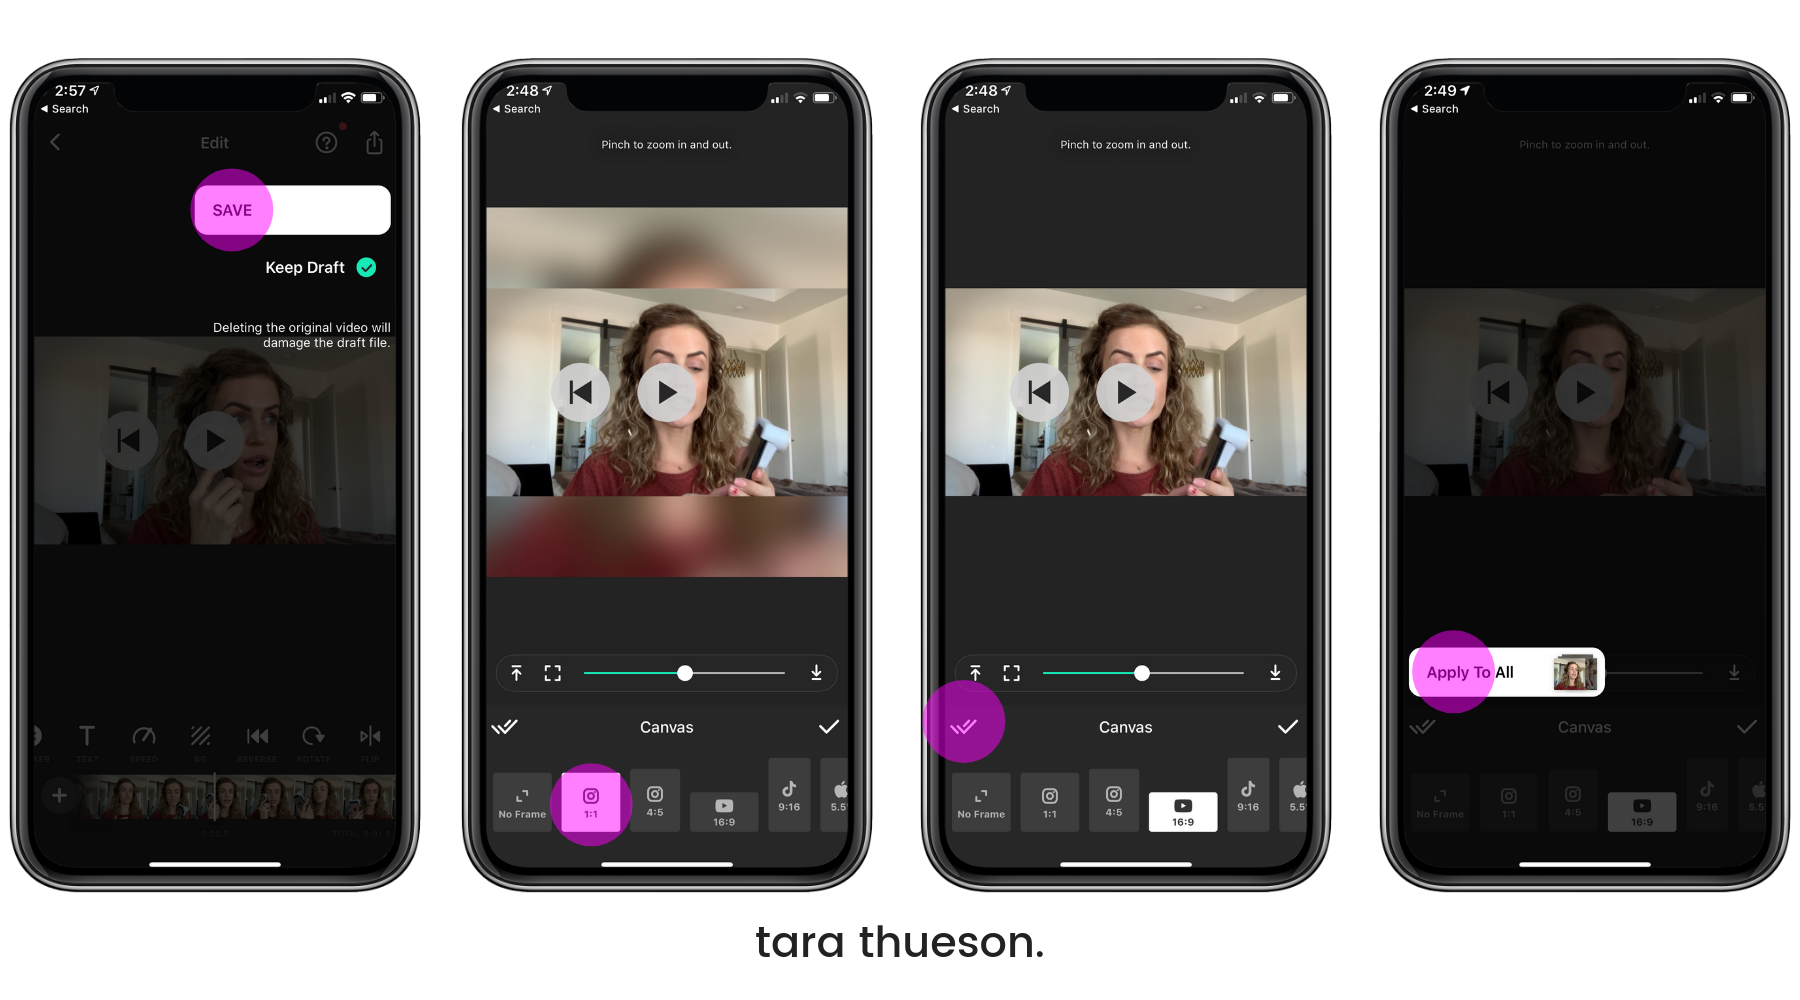
Once you’ve got your video cut down and your sections in the order you want them, now is the time to go in and add some pizazz to your video! But first, you want to make sure you save a draft of your video by tapping in the upper right corner. It’s important to do this every few minutes through your video making to ensure that you always have the latest version.
You also want to make sure you have your video in the format you need it in. It can fit your Instagram stories, Facebook, YouTube, wherever you want to put it. You can choose to have the edges blurred if you want to keep your widescreen format but play it on your Instagram stories or you can zoom in and have the video fill the screen!
And a good thing to remember is if you want to apply your format, filter, etc to AL frames, just tap the double arrow on the left side.
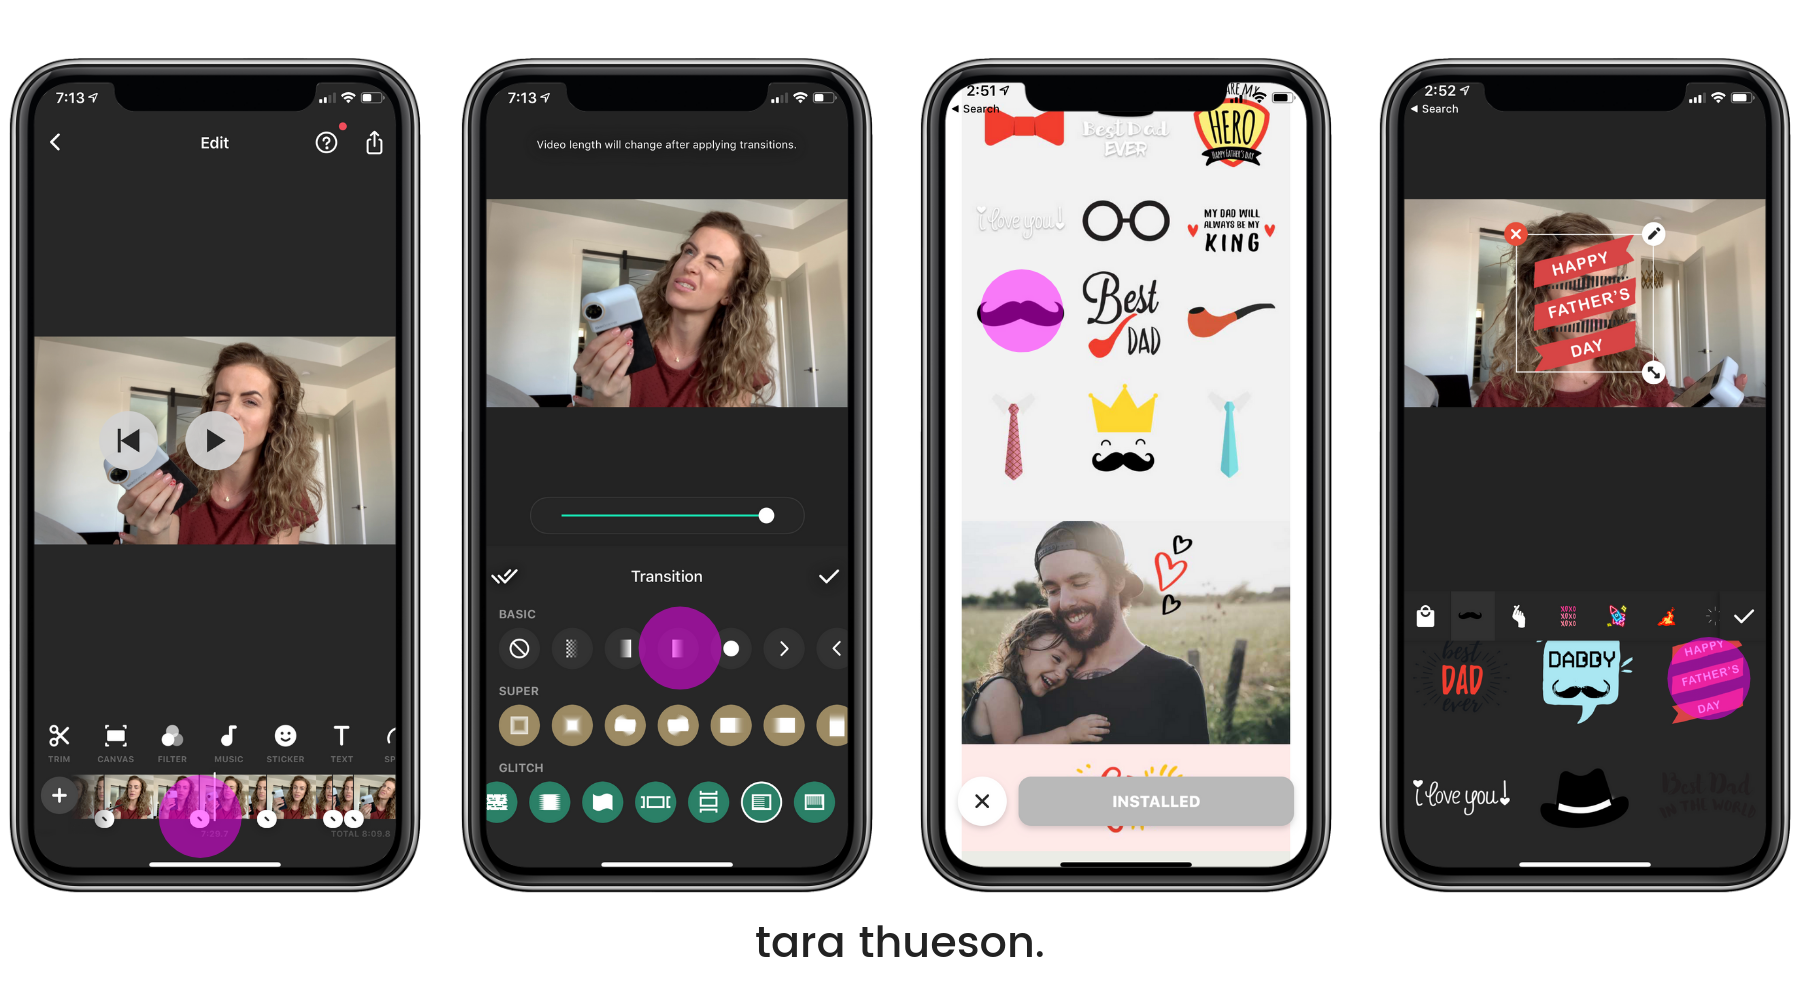
Adding Transitions & Stickers
See all those white marks under my video? Each of those are where I split or cut the video. When . you tap on those, you can select a transition effect for your video. Some cuts may not need transitions but other, where it jumps from one subject to the next, might benefit aesthetically from having a cool transition. There are so many to choose from!
Next, you can add any stickers and visual effects to your video. They usually have seasonal ones as well!
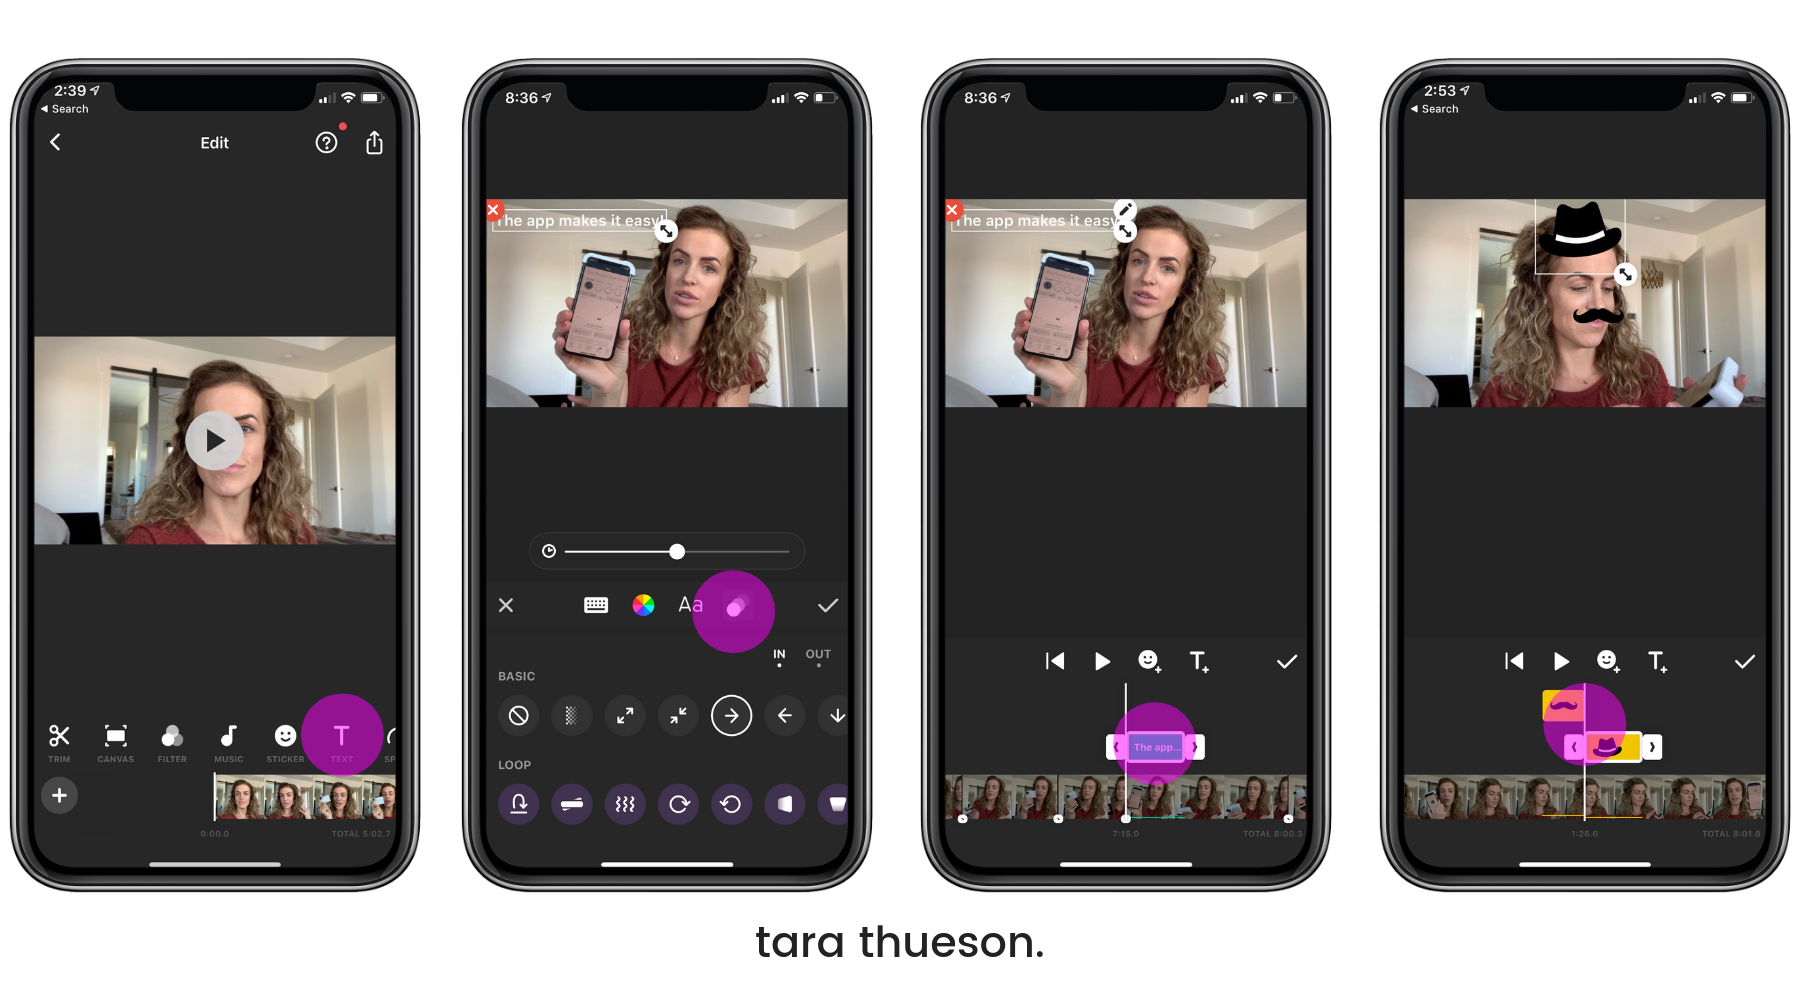
Adding Text & Overlapping Effects
Next, you might want to add some text overlays to your video. Because I cut out all the parts of me asking the kids questions, you can watch the video and have no idea what they’re answering. So I like to add some text and put the question up on the screen. These can then be manipulated as well and have effects or transitions applied to them. I can have the text swoop in from the side, disappear after 3 seconds – play around with these!
And once you’ve added stickers, text, or even music, you can go in and move things around. Keep in mind you can always hit the play button as well to see how things unfold!
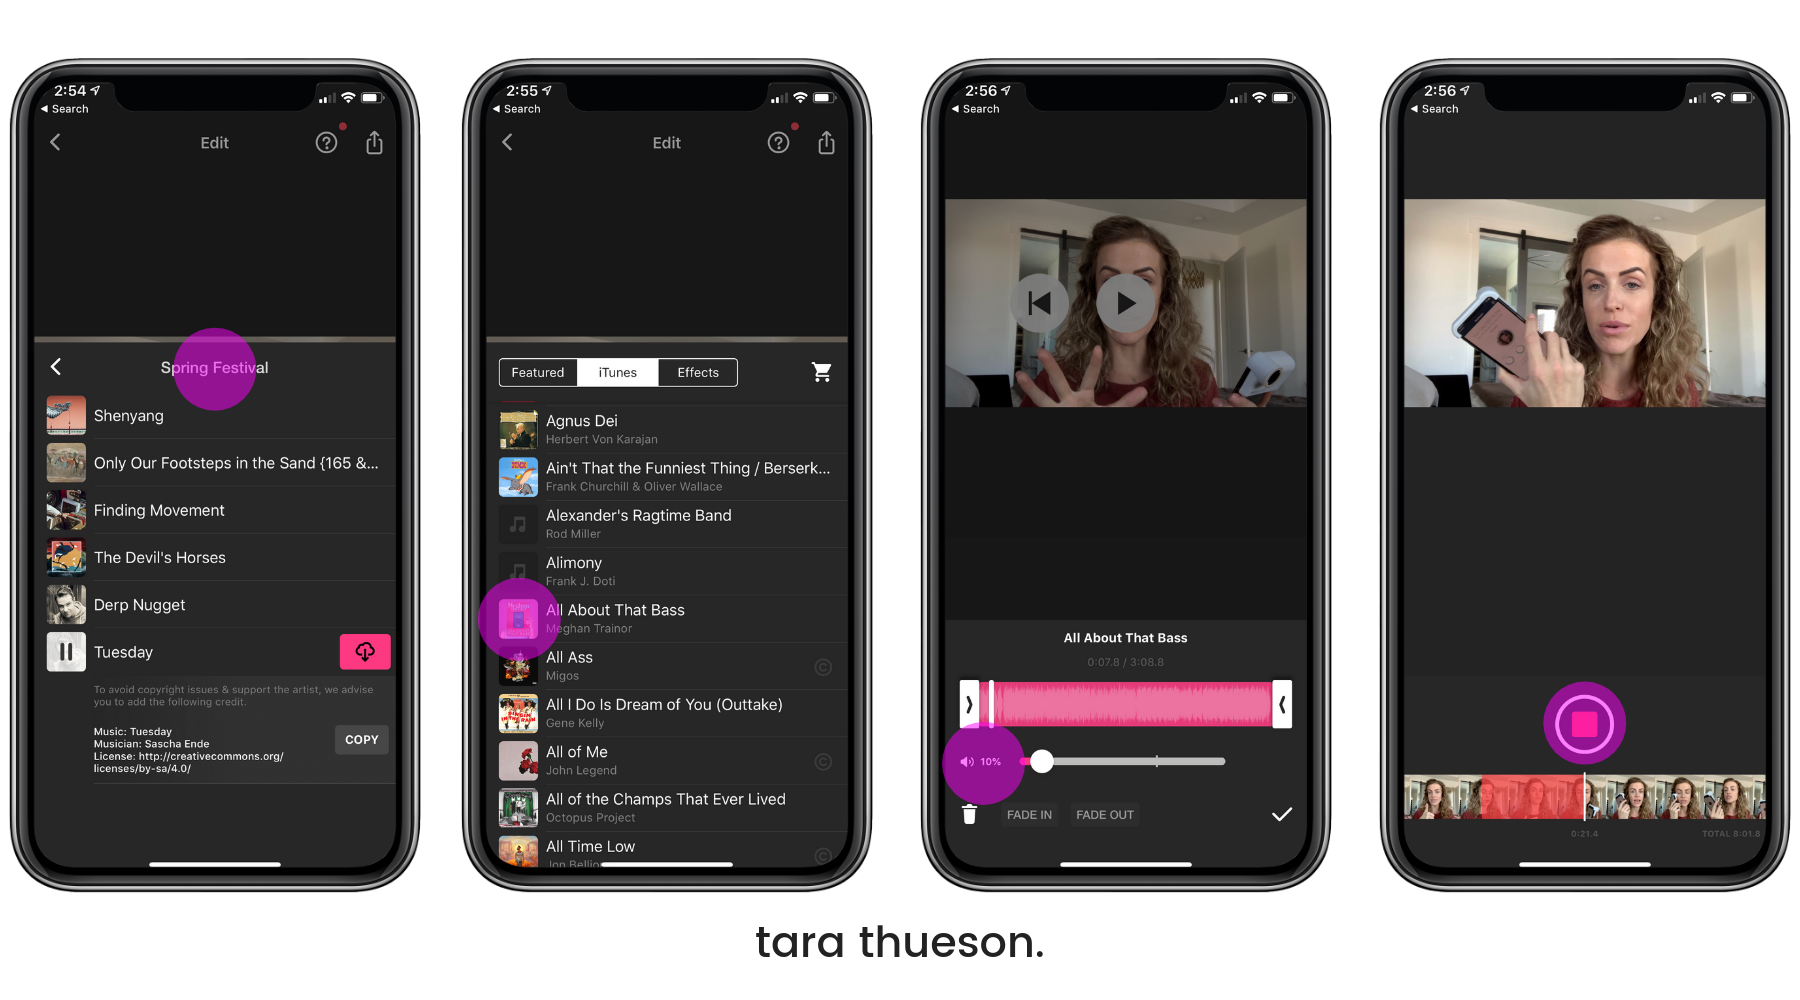
Adding Music, Doing A Voiceover, Adding Sound Effects
This is easily one of the most fun parts of editing your own video right from your phone! You can pull downloaded music from your iPhone or use one of their license-free tracks they provide! They also provide sound effects (think a big ‘CRASH’ sound when your kid runs into the door) and allow you to record a voiceover over your existing footage – this is great for tutorials! You can adjust the volume, making sure it doesn’t drown out your main audio.
And then save it, export it, and you are guaranteed to have the most epic tear-jerker on Father’s Day!
You don’t have to stop there. You can also speed parts or all of your video up, add filters, rotate it (I can’t be the only one who’s recorded sideways..), reverse it…there are so many things you can do! So go grab your kids, record their answers, and spending an hour or two putting together a gift your guy will never forget!
Xx Tara
P.S. I’d love to see what you put together! Make sure you tag me (@tarathueson) if you share on social media! I just want to see all the grown men crying!!! haha
How do you find your video once you saved it?
I have my video I’ll edited it on my phone. I was able to do it while at swimming lessons, basketball camp, and sneak it in here and there when my husband was home . Thank you for the tutorial. I am so excited to share it with him. I just have one thing, I can’t figure out how to export it. I’m sure it’s something super simple that I’m just missing .
Please ignore my last comment. I figured it out. Duh. I was working on it so fast that I never took the time to look at the save screen
Haha – no worries! Been there. So glad you figured it out!
It should be in your photos or video folder on your phone!
What music did you use on yours
The InShot video turned out perfect quality on my phone but when uploaded to routine it’s pretty blurry. Any suggestions?
How would you save your video if you want to play it back on your TV and you don’t have a smart TV?
I would use a thunderbolt to HDMI adapter and then plug the HDMI cord into the back of the TV!