Journal keeping is the bane of my existence. I want to remember all the cute smiles, funny words, and times my kids weren’t fighting…and maybe some of the times they do fight.
But if I’m honest, I’m not a chronic journaler.
I think it’s a toss-up between laziness and simply not making the time. And my phone is such a huge part of my business and daily life that if it’s not on my phone, often times it doesn’t get done.
So a while back I was looking for something simple to keep a record of my kids that would also allow me to jot a few notes down so I could remember the moment forever.
Enter in the Collect app.
With Collect, you can add titles, tags & detailed notes to your photos and record your life – at least the portion you capture pictures of.
And it goes way beyond your normal everyday journal. Here’s how you can get your’s set up and how I use it to create vivid photo journals of our lives!
First off, the app is $1.99. Totally worth it in my opinion.
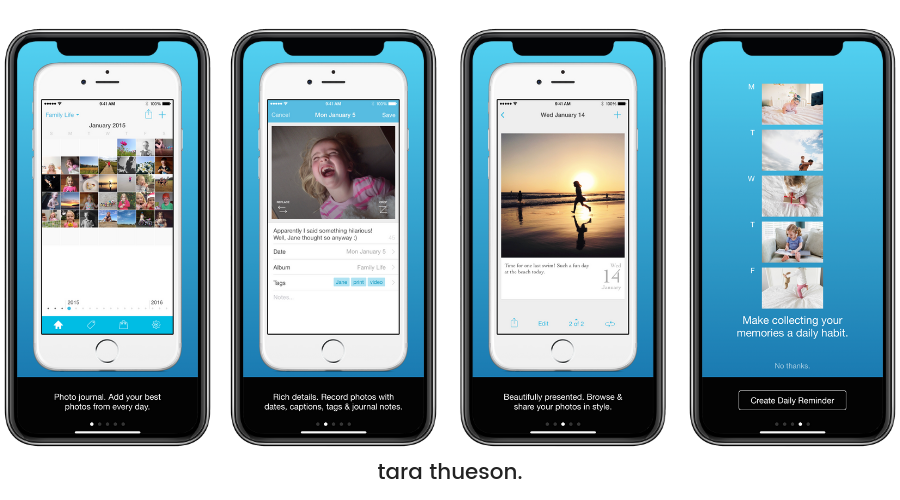
When you first open up the app it’s going to walk you through the basics of creating a journal/photo entry, the way you can add details, the options for display, and setting daily reminders. I don’t think it’s highly informative so just swipe through quickly so you can get to the main screen.
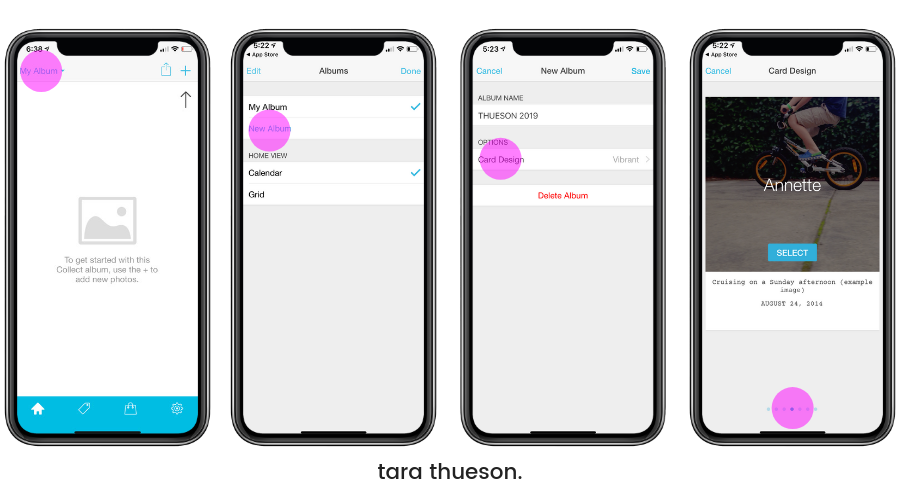
Setting Up Your Album
With the $1.99 version of Collect, you have 1 album to build. If you want to upgrade (you can do all options for $4.99) you will get the option to build out multiple albums.
I have albums for 2017 and 2018. For the purpose of this tutorial, I got to work on my 2019 Album. You can create albums for events, holidays, specific children etc – it’s up to you!
After you create your album, you now get to pick the style of your entries. They have 7 options to choose from that span from handwritten to typewriter to modern. Just select the card style that fits you the best. Take into consideration that if you ever send this album to print or create a slideshow, it will incorporate the selected style. This can be changed in your album options at any time!
Creating An Entry
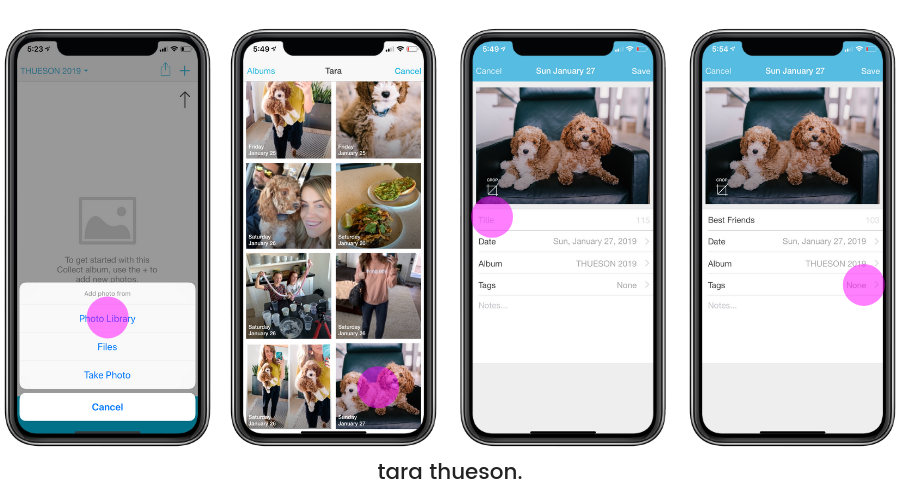
To create an entry in your album you are going to click on the ‘+’ in the upper right corner. You have 1 of 3 options:
- Photo Library: this will access all existing photos on your phone
- Files: this will access all photos in the cloud
- Take Photo: take a photo in the moment! Nothing like a fresh memory to capture!
If you select option 1 or 2 you’re going to select your photo. We have a new puppy at our house and I wanted to document the moment that olive/penny/lolly (still haven’t chosen a name) and Goldie decided to be friends.
Once you’ve selected your photo you’re going to get the following options:
- Title: this is what will show underneath the photo in your new album and can be something fun and short to describe the moment
- Date: this program is pretty smart and can tell the date your photo was taken. You’ll have the option to keep the original date or reassign the photo to another day
- Album: at this point, you can still assign the photo to a different album if you change your mind
- Tags: tags are like hashtags or the Dewey decimal system for your photos.
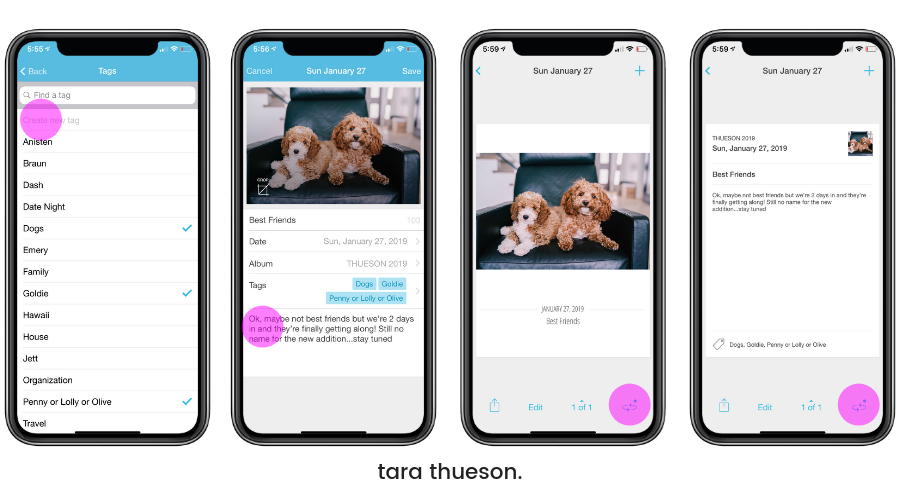
The first time you click on ‘tags’ you will notice that the screen is blank and your only option is to create new tags. I created a few to start out but you can create them as you go and they become relevant. Every time you add a new photo you should select the appropriate tags for indexing. Tagging your photos allows you to easily search for photos with a specific subject matter be it a specific person (I’ve got all my kids, Braun, and the dogs in there under their own tags) and I will often assign multiple tags to a single photo. I want them to show up under every possible search that applies to them.
Adding Notes
Adding a note to your new entry is the last option on the screen. This can be a funny caption, maybe something funny a child said, or a few sentences to help you remember exactly what was going on in that photo.
Once you’ve saved your entry, you can see how it will appear in your album (see the 3rd phone screen over). Based on the style I chose, my photos/entries will feature the photo with the date and title directly below.
If you select the icon on the far right, the card will flip and you will see the notes that you put in when you created your post.
• • •

Navigating your Album
Once you’ve started to fill up your album, you can view it by selecting the ‘home’ icon on the far left. The share icon on the top right will allow you to create a collage, a video, or to export all of your photos with their caption and notes. I’ve created many photo albums this way and slideshows. We love to sit around and watch these on our big TV through Apple Play. It’s an awesome way to share special moments with the whole family!
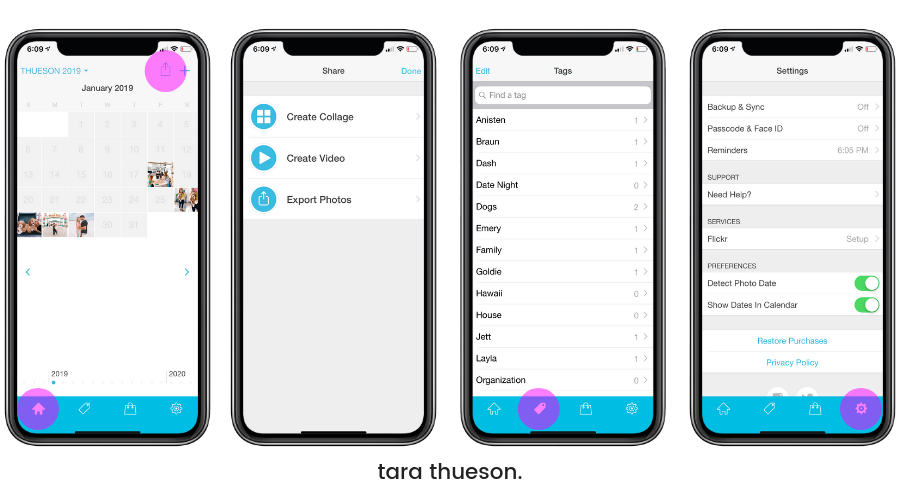
The ‘tag’ icon second from left will show you all of your tags and how many photos are tagged with that specific tag. You can search your tags and pull up all photos pertaining to that tag. Super simple. Super easy to search.
The third icon from the left is where you upgrade your app (more albums etc) and the far right ‘settings’ icon is where you can set your preferences for your app.
And that’s it! Use the app to complete your photo-a-day project in 2019 or just capture and celebrate everyday moments. Take advantage of the special exporting features to share the work you’ve done with your photos.
I love this to keep a record of our lives! When my Instagram was hacked a few months ago, I was devastated. I thought I had lost years of photos and memories. But with Collect, I’m able to create an in-the-moment journal/photo entry that allows me to keep all the main details in one convenient place. I can always go back in and add detail later!
I hope you love this app as much as I do and I can’t wait to see what you create with it! My family is growing up fast and I want to make sure I don’t miss a beat!
xx Tara
Are there other record/journal apps you love? Tell me below!


I have a private Instagram account that’s synced with chatbooks. Bam. Done.
I love Tuesday now with techy new stuff!! I also love Collect. I printed them all out for 2 years and actually did a pocket scrapbook with them. (Project Life). So fun to look back at them.
Idea for a Tuesday?? iMovie please please. Would love to know how you do your vacations!
Thanks Tara!
So can you print the album after a year or is it just meant to be digital?
Great!!! That is exactly what i was looking for, thank you so much!!! Do you know if there is a way to print the albums later on? Love you blog!!! Such great content xxx
Do the books have a limit of the pages you can make?
I don’t believe so – I haven’t hit a limit yet!
You can always pull up your old albums and print them whenever you want!
Either – up to you!
It’s on my list!!!
That’s awesome! Love Chatbooks!
Ok i LOVE this app. Downloaded it this am and just journaled our whole Hawaii trip in 20 mins. Do you mine sharing where you printed your cute cards on the insta photo. I love them